- Node and npm instalation
- Webpack instalation
- Webpack.config.js
- Work with HTML files
- Work with styles
- Server config
- Work with JS
- Fonts
- Images
- Full webpack.config.js file
Webpack is a tool for bundling web applications. It allows you to break your code into modules and collect them in one or more files, thereby reducing the number of requests to the server and the size of downloaded files.
The main function of Webpack is to analyze and combine the various resources of your project, such as JavaScript files, CSS files, images and other resources, into a format that can be used by a browser.
Node and npm instalation
Let’s check the node version, open a terminal on your computer and type the command into it:
node -v

If we saw the version of node, it means that it is already installed on our computer, if you did not see the version, use the instructions on the official website of node.js – nodejs.org
After installing node, we can install npm itself.
npm must be installed directly in your project. To do this, open a terminal in the project or go to it using the command:
cd path/to/your/project
Now that we are in our project, we can initialize npm by entering the following command in the terminal:
npm init -y
After successful initialization, a package.json file will appear in the root of your project.
Webpack instalation
If we successfully initialized npm, we can start installing Webpack itself, for this, enter the command in the terminal:
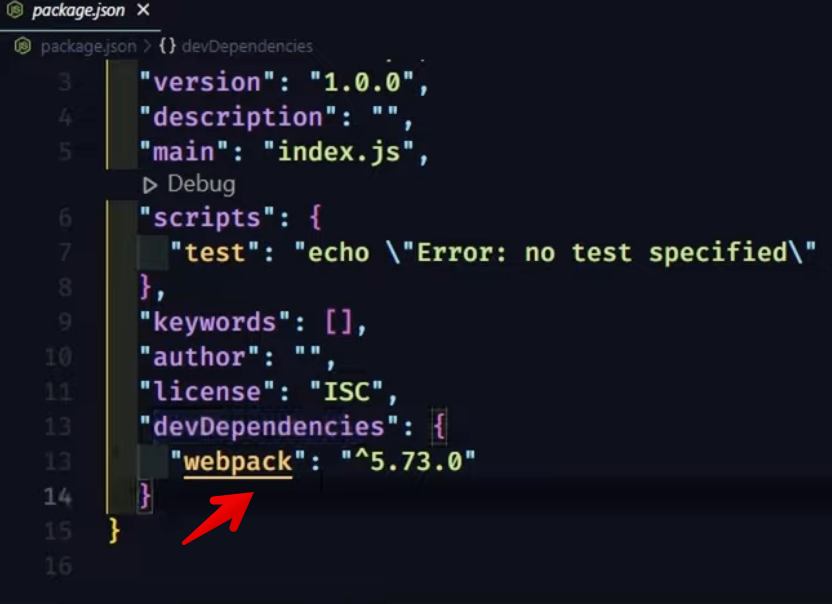
npm install webpack -D
After that, a new property called devDependencies will appear in the package.json file and in it we will see the settings of our WebPack.
Webpack CLI
The next step is to enter the command in the terminal:
npm install webpack-cli
The npm install webpack-cli command installs a command line interface (CLI) for Webpack that allows you to use Webpack from the command line of your operating system.
Once webpack-cli is installed, you will be able to call Webpack commands directly from the command line. For example, you can call the webpack command to start building your project using the webpack.config.js configuration file.
Webpack local server
If we need a local server, enter the command in the terminal:
npm install webpack-dev-server -D
webpack-dev-server is a package that provides a development server specifically designed for use with Webpack. It allows you to quickly deploy a local server to test your code while developing a web application.
All of these will also appear in devDependencies:
Configure startup commands
Let’s open the package.json file located at the root of our project and find “scripts” property in it.
Each element of the scripts property is a key-value pair, where the key is the name of the command that you will call from the command line, and the value is the command or set of commands that will be executed when that command is called.
Add our commands:
"scripts": {
  "start": "webpack serve", //starts our webpack virtual server
  "build-dev": "webpack",//runs a test build of our project
  "build-prod": "webpack --node-env=production",//runs our final production build
  "clear": "rd /s /q dist"//clear our dist folder
}
To use our commands in the terminal we write:
npm run "command-name"
For example:
npm run build-prod
Webpack.config.js
The webpack.config.js file is a configuration file for Webpack that is used to define build options for your JavaScript code. It needs to be created in the roots of our project next to the package.json file.
Here is an example of such a file:
const path = require('path');
module.exports = {
entry: './src/index.js', // Entry point where bundling begins
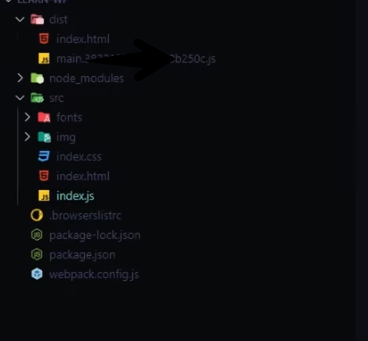
output: {
path: path.resolve(__dirname, 'dist'), // Path to the directory where the compiled code will be saved
filename: 'bundle.js' // Collected file name
},
module: {
rules: [
{
test: /\.js$/, // Regular expression to select JavaScript files
exclude: /node_modules/, // Excluding files from processing
use: {
loader: 'babel-loader', // JavaScript transpilation loader (e.g. Babel)
options: {
presets: ['@babel/preset-env'] // Set of transpilation rules
}
}
}
]
},
devServer: {
contentBase: path.resolve(__dirname, 'dist'), // Directory from which static content will be served
port: 9000 // Port on which the dev server will be launched
}
};
We’ll modify it a little:
const path = require('path');

const mode = process.env.NODE_ENV || 'development'; //explicitly specify the bundling type

const devMode = mode == 'development'; //check whether we have a development bundling

const target = devMode ? 'web' : 'browserslist'; //if we have a build for specific browsers

const devtool = devMode ? 'source-map' : 'undefined'; //if we do not have a production build, then we will not add a sourcemap

module.exports = {

	//add our constants as object properties
	mode,
	target,
	devtool,

 	entry: path.resolve(__dirname, 'src', 'index.js'), // Let's use our index.js file in the src directory
 	output: {
    path: path.resolve(__dirname, 'dist'),
    filename: 'index.[contenthash].js' // The name of the collected file with the version to reset the caching
    clean: true, //let's clean up our directory
  },

};
Now we need to add a file with a list of browsers .browserslistrc to the root of our project. We will add to this file:
last 2 versions
not dead
> 0.5%
Work with HTML files
Now you need to add a plugin for WebPack that works with HTML. Enter the following command in the terminal:
npm install --save-dev html-webpack-plugin
Now let’s add our plugin to the webpack.config.js file:
const path = require('path');


//Add our plugin <--------------
const HtmlWebpackPlugin = require('html-webpack-plugin');


const mode = process.env.NODE_ENV || 'development';

const devMode = mode == 'development';

const target = devMode ? 'web' : 'browserslist';

const devtool = devMode ? 'source-map' : 'undefined';

module.exports = {

	mode,
	target,
	devtool,

 	entry: path.resolve(__dirname, 'src', 'index.js'),
  output: {
    path: path.resolve(__dirname, 'dist'),
    filename: 'index.[contenthash].js'
    clean: true,
  },


  //Let's create an instance <--------------
  plugins: [
  new HtmlWebpackPlugin({
  	template:path.resolve(__dirname,'src', 'index.html')//Write the path
  }),

  ],

};
The html document created by us that will be displayed on local hosting must be reloaded every time. In order for index.html to be updated automatically, add it to the terminal:
npm install --save-dev html-loader
Now let’s write it in the settings of our webpack.config.js file:
module: {
    rules: [
      {
        test: /\.html$/, // Regular expression to select JavaScript files
        loader: 'html-loader',
      }
    ]
  },
Let’s add tracking to our index.js file:
import './index.html';

Work with styles
style-loader helps you include CSS styles directly in your application’s JavaScript code, which is convenient for development and for working with other tools to compile and optimize your project.
Let’s add it to the terminal:
npm install --save-dev style-loader
Also add css-loader:
npm install --save-dev css-loader
Let’s add our modules to the rules of the webpack.config.js file:
module: {
    rules: [
      {
        test: /\.html$/,
        loader: 'html-loader',
      }

      {
        test: /\.css$/i, //Regular expression to select css files
        use: ["style-loader", "css-loader"],//our modules
      },

    ]
  },
Now add CSS tracking to our index.js file:
import './index.css';
So that our styles are not added to the body of the html, let’s install the plugin:
npm install --save-dev mini-css-extract-plugin
Connect our plugin in the same way as connecting an html plugin:
const MiniCssExtractPlugin = require("mini-css-extract-plugin");
Add our plugin to webpack.config.js:
plugins: [
    new HtmlWebpackPlugin({
        template: path.resolve(__dirname, 'src', 'index.html')//write the path
    }),

    new MiniCssExtractPlugin({
        filename: 'index.[contenthash].css',
    })

],
Add rule:
module: {
    rules: [
        {
            test: /\.html$/,
            loader: 'html-loader',
        },

        {
            test: /\.css$/i,
            use: [
                devMode ? "style-loader" : MiniCssExtractPlugin.loader, //our rule
                "css-loader"
            ],
        },

    ]
},
SCSS support
SASS (Syntactically Awesome Style Sheets) is an advanced syntax language for CSS that adds powerful interpretation capabilities to regular CSS. The main purpose of SASS is to facilitate and improve the process of writing and maintaining styles for websites and web applications.
Change in the module settings:
{
    test: /\.(c|sa|cs)css$/i, //search for css sass scss
    use: [
        devMode ? "style-loader" : MiniCssExtractPlugin.loader,
        "css-loader"
    ],
}
Let’s connect the module with analogy as we did before:
npm install sass-loader sass -D
Let’s add this in the module settings:
{
    test: /\.(c|sa|sc)ss$/i,
    use: [
        devMode ? "style-loader" : MiniCssExtractPlugin.loader,
        "css-loader",
        'sass-loader'//our module
    ],
},
Now we can rename our index.css file to index.scss:
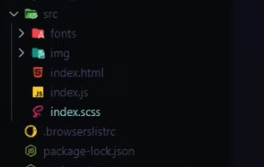
let’s go to our index.js file and change import './index.css'; on import './index.scss';
Autoprefixes
Add the following commands to the console:
npm install --save-dev postcss-loader postcss
npm install postcss-preset-env --save-dev
postcss-loader allows you to process CSS using PostCSS plugins. PostCSS is a tool that allows you to perform various automatic operations on CSS, such as auto-prefixes, optimization, adding or removing vendor prefixes, etc. postcss-loader integrates PostCSS into your Webpack configuration to automate CSS handling when building your project.
postcss is the core of PostCSS, without which PostCSS plugins will not work. It contains basic functions and interfaces for processing CSS using various plugins.
postcss-preset-env is a PostCSS plugin that provides the ability to use modern CSS features that may not yet be officially supported in all browsers. It automatically analyzes your CSS and automatically adds the necessary prefixes and polyfills to ensure compatibility with different versions of browsers.
Let’s add these modules to webpack.config.js:
{
    test: /\.(c|sa|sc)ss$/i,
    use: [
        devMode ? "style-loader" : MiniCssExtractPlugin.loader,
        "css-loader",
            {
                loader: "postcss-loader",
                options: {
                    postcssOptions: {
                        plugins: [require('postcss-preset-env')],
                    }
                }
            },
        'sass-loader'
    ],
},
Server config
The devServer settings in the Webpack configuration are used to configure the local development server. Here’s a brief description of each of these settings:
devServer: {
    port: 3000,
    open: true,
    hot: true,
}
- port: 3000 – this option sets the port on which the local server will run. In this case, the server will be available at http://localhost:3000/.
- open: true – when set to true, this will automatically open the browser when starting the local server.
- hot: true – this setting enables Hot Module Replacement (HMR). Hot swapping of modules allows you to make changes to the code and see them immediately in the browser without reloading the page
Work with JS
First, let’s install Bebel, a JavaScript transpilation tool that allows developers to write code in the latest version of JavaScript without worrying about whether all browsers and runtimes support it.
npm install -D babel-loader @babel/core @babel/preset-env
Let’s add Bebel for JS in the webpack.config.js file:
{
    test: /\.(?:js|mjs|cjs)$/,
    exclude: /node_modules/,
    use: {
        loader: "babel-loader",
        options: {
            presets: [
                ["@babel/preset-env", { targets: "defaults" }],
            ],
        },
    },
},
Also add a polyfill, this will ensure compatibility of the code with older versions of JavaScript and different browsers:
npm install --save @babel/polyfill
Тепер замінимо в webpack.config.js:
entry: path.resolve(__dirname, "src", "index.js"),
on
entry: ['@babel/polyfill', path.resolve(__dirname, "src", "index.js")],
Fonts
In webpack.config.js, add dependencies for fonts:
{
    test:/\.woff2?$/i,
    type: 'assets/resource',
    generator: {
        filename: 'fonts/[name][ext]'
    }
}
Now we will add the fonts.scss file to the style directory of our project. In the file, we will connect our fonts:
@font-face {
    font-family: 'Montserrat';
    src: url('fonts/montserrat.woff') format('woff2'), url('fonts/montserrat.woff2') format('woff'); //write the paths relative to the index.scss file
}
Now import these fonts into the index.scss file:
@import 'style/fonts';
Images
Let’s add dependencies to our webpack.config.js file:
{
    test:/\.(jpe?g|png|webp|gif|svg)$/i,
    type: 'assets/resource',
}
Optimize the size of images. Let’s add a package:
npm install image-webpack-loader --save-dev
Let’s connect our package:
{
    test: /\.(jpe?g|png|webp|gif|svg)$/i,

        use: [
            {
                loader: 'image-webpack-loader',

                options: {
                    mozjpeg: {
                        progressive: true,
                    },
                    // optipng.enabled: false will disable optipng
                    optipng: {
                        enabled: false,
                    },
                    pngquant: {
                        quality: [0.65, 0.90],
                        speed: 4
                    },
                    gifsicle: {
                        interlaced: false,
                    },
                    // the webp option will enable WEBP
                    webp: {
                        quality: 75
                    }

                }
            }
        ]

    type: 'assets/resource',
}
Full webpack.config.js file
const path = require("path");

const HtmlWebpackPlugin = require("html-webpack-plugin");
const MiniCssExtractPlugin = require("mini-css-extract-plugin");

const mode = process.env.NODE_ENV || "development"; //specify the build type

const devMode = mode == "development"; //check if we have a development project build

const target = devMode ? "web" : "browserslist"; //if we have a build for specific browsers

const devtool = devMode ? "source-map" : "undefined"; //if we do not have a production build, then we will not add a sourcemap

module.exports = {
    mode,
    target,
    devtool,

    devServer: {
        port: 3000,
        open: true,
        hot: true,
    },

    entry: path.resolve(__dirname, "src", "index.js"), // Use our index.js file in the src directory
    output: {
        path: path.resolve(__dirname, "dist"),
        filename: "index.[contenthash].js", // Name of the collected file with the version to reset the caching
        assetModuleFilename: 'assets/[name][ext]',
        clean: true, //Clean up our director
    },

    plugins: [
        new HtmlWebpackPlugin({
            template: path.resolve(__dirname, "src", "index.html"), //Write the path
        }),

        new MiniCssExtractPlugin({
            filename: "index.[contenthash].css",
        }),
    ],

    module: {
        rules: [
            {
                test: /\.html$/, // Regular expression to select JavaScript files
                loader: "html-loader",
            },

            {
                test: /\.(?:js|mjs|cjs)$/,
                exclude: /node_modules/,
                use: {
                    loader: "babel-loader",
                    options: {
                        presets: [
                            ["@babel/preset-env", { targets: "defaults" }],
                        ],
                    },
                },
            },

            {
                test: /\.(c|sa|sc)ss$/i,
                use: [
                    devMode ? "style-loader" : MiniCssExtractPlugin.loader,
                    "css-loader",
                    {
                        loader: "postcss-loader",
                        options: {
                            postcssOptions: {
                                plugins: [require("postcss-preset-env")],
                            },
                        },
                    },
                    "sass-loader",
                ],
            },

            {
                test: /\.woff2?$/i,
                type: 'assets/resource',
                generator: {
                    filename: 'fonts/[name][ext]'
                }
            },

            {
                test: /\.(jpe?g|png|webp|gif|svg)$/i,

                    use: [
                        {
                            loader: 'image-webpack-loader',

                            options: {
                                mozjpeg: {
                                    progressive: true,
                                },
                                // optipng.enabled:
                                optipng: {
                                    enabled: false,
                                },
                                pngquant: {
                                    quality: [0.65, 0.90],
                                    speed: 4
                                },
                                gifsicle: {
                                    interlaced: false,
                                },
                                // the webp option will enable WEBP
                                webp: {
                                    quality: 75
                                }

                            }
                        }
                    ],

                type: 'assets/resource',
            }

        ],
    },
};
the base is there, saved