How to protect a website on WordPress? In fact, this is a very relevant question for WordPress site owners. Thousands of websites are hacked every day, and in order to avoid becoming a victim of hackers, we recommend following tips on how to protect your website from WordPress viruses and more.
This article describes the most common WordPress security problems and how to solve them, including tips on how to avoid hacking.
Install the security plugin
Most of the tips listed below in the article are already included in custom WordPress security plugins:
- WordFence
- All In One WP Security & Firewall
- iThemes Security
- Sucuri Security
Here are some typical features included in the plugins listed above:
- Generate and use strong passwords when creating user profiles.
- Forced password expiration and regular reset.
- Registration of user actions.
- WordPress Security Key Updates.
- Scan for malware.
- Two-factor authentication.
- reCAPTCHA
- WordPress Security Firewalls.
- White and black lists of IPs.
- Logging changes (Changelog).
- Monitor DNS changes.
- Block malicious networks.
- View WHOIS information about visitors.
Changing access rights to wp-config.php and .htaccess files
Changing file permissions in WordPress is of great importance in terms of the security of your site.
According to the WordPress documentation, all files must have permissions 644 or 640. Exception: wp-config.php must be 440 or 400 to prevent other users on the server from reading it. All directories must have permissions 755 or 750. There is no need to give permissions 777, even for the /uploads/ directory.
Use an up-to-date and secure version of PHP
Using an up-to-date version of WordPress is essential for a variety of reasons related to security, functionality, and performance. Here are some top reasons why you should always update WordPress to the latest version:
- Security: With every WordPress update, developers include security vulnerability fixes and other measures to strengthen system security. Unupdated versions may be susceptible to attacks such as hacks, viruses and malware.
- New Features and Improvements: Each new version of WordPress brings improvements to functionality, usability, and performance. The update allows you to take advantage of new features and tools to create and manage your website.
- Plugin and Theme Compatibility: Over time, WordPress plugin and theme developers also release updates to support the latest core versions. Using outdated versions of WordPress can lead to conflicts and compatibility issues.
- Support and Community: The WordPress developers and community actively support only the latest versions. If you run into problems, it will be easier to get help and solutions if you are using the latest version.
- More reliable and stable performance: The current version of WordPress offers more stable and reliable performance, which reduces the risk of crashes and problems on your site.
- Compliance with security standards and regulations: In some cases, compliance with security standards and regulations may be required (for example, in the case of storing user personal data). Using an up-to-date version of WordPress helps you meet these requirements.
Disable editing of themes and plugins at the WordPress admin level
If hackers gain access to an admin account, it will be very easy for them to inject malicious code into your WordPress themes and plugins. We will use DISALLOW_FILE_EDIT to disable editing of files and increase site security.
Let’s see below how to do this:
- First, open the wp-config.php file using any text editor.
- Inside this file, paste the following code: define( ‘DISALLOW_FILE_EDIT’, true );
- Save your changes and close the file.
Keep your WordPress plugins updated
It’s also a good idea to follow niche blogs and WP fan groups on social media. Many WordPress users share notifications about critical errors in certain WordPress plugins. If you see an error regarding a plugin you are using on your WordPress site, update it immediately. Also, be sure to remove unused plugins to avoid unnecessary vulnerabilities in your security system.
Only install WordPress themes and plugins from trusted sources.
The safest way is to use the official database/repository.
WordPress themes can be found here
Change wp_prefix in the database during WordPress installation
By default, WordPress is installed with the wp_ prefix, but you should change it to your own during the process. This will make it more difficult for malware to access our database and extract data.

Do not use the standard “Admin” login. Use strong passwords
Be sure to change your login to your own. Also remember that complex passwords using several different characters are much more difficult to crack.
Disable user registration and comments if you don’t need them
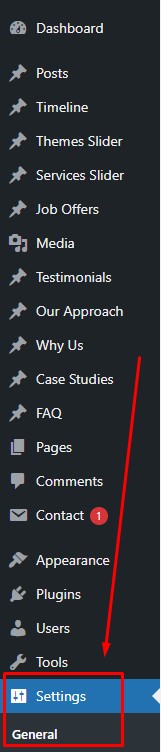
- Go to the Settings page, General section.

General section - Uncheck the “Anyone can register” box in the Membership section.
- Save your changes.
- Uncheck the “Allow people to post comments on new articles” box.
Disable comments - Save your changes.

Hide author pages
This code allows you to disable author pages in WordPress by redirecting requests to them to the main page of the site. This can be useful for sites that don’t want to display author pages or want to improve security by hiding user information.
Via .htaccess
#Disable Author Pages
<IfModule mod_rewrite.c>
RewriteEngine On
RewriteBase /

RewriteCond %{REQUEST_URI}  ^/$
RewriteCond %{QUERY_STRING} ^/?author=([0-9]*) [NC]
RewriteRule ^(.*)$ http://%{HTTP_HOST}/? [L,R=301,NC]
</IfModule>
Via function.php
function author_page_redirect() {
    if ( is_author() ) {
        wp_redirect( home_url() );
    }
}
add_action( 'template_redirect', 'author_page_redirect' );
Two-factor authentication
To enable this feature, first download the Google Authenticator plugin.
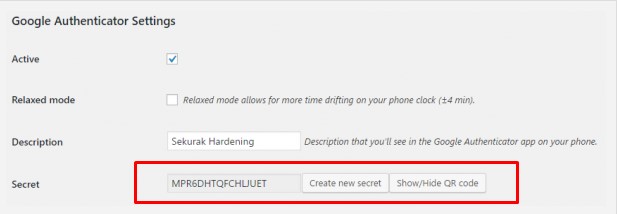
Once installed, go to your profile page and check the “Active” box in your Google Authenticator settings.
Now is the time to install the Google Authenticator app on your phone.
After launching the authenticator, you should be prompted to enter a code or scan a QR code. Go back to the plugin settings and either copy the code into the application, or select “Show/Hide QR code” and scan it with your phone.
The automatic setup will begin, you need to accept all changes and then click “Update profile” on the “Your profile” subpage. From now on, every login attempt will require two-factor authentication on the WordPress login page.
Limit the number of login attempts
As previously mentioned, another method to prevent brute force attacks is to limit the number of times a user can log in to the system. How to do it?
Probably the easiest solution is to use one of the many WordPress security plugins, such as WP Limit Login Attempts by Arshid.
Hide information about the versions of WordPress you are using
Information about your WP version can be useful to hackers, so there is no need to share it freely. First, block access to the readme file by adding the following lines of code to your .htaccess file:
<files readme.html>
Order allow,deny
Deny from all
</files>
You can also remove version information by adding the following lines to your function.php file:
function wpbeginner_remove_version() {
return '';
}
add_filter('the_generator', 'wpbeginner_remove_version');
Block execution of PHP scripts in those WP directories where it is not required
Prevent execution of PHP files in unauthorized directories to improve the security of your platform. Open a text editor and enter the following code:
<Files *.php> Deny from all </Files>
Save this text file as .htaccess and upload it to the /wp-content/uploads/ folder on your site. Or other convenient folders
Disable access to your WordPress REST API
If you do not plan to use this API, then you can disable access to it using the following code:
function qode_disable_rest_api( $access ) {
return new WP_Error( 'rest_disabled', __( 'The WordPress REST API has been disabled.' ), array( 'status' => rest_authorization_required_code() ) );
}
add_filter( 'rest_authentication_errors', 'qode_disable_rest_api' );
Or via .htaccess:
<Files xmlrpc.php> Order deny,allow Deny from all </Files>
Moving wp config
Moving wp login
The WordPress admin panel allows you to perform most of the site management. With its help, you can create/edit content, install/remove plugins, work with registered users, get some statistics on the site’s performance, etc.
By default, WordPress uses the following addresses to log in to the admin panel:
https://site.ru/wp-admin/
https://site.ru/wp-login.php
We will use solutions that will solve the problem in one click. You don’t have to write a single line of code, but simply install/activate and specify the desired address. Plugin – “Rename wp-login.php“.
So, after installing and activating wp-login.php plugin, it will immediately redirect you to the Settings > Permalinks page, where you can enter the address at which you will need to log into the admin panel.
Basic HTTP authentication (htpasswd)
Another way to secure your admin login is to add HTTP authentication. You will be required to log in before you can access the standard WordPress dashboard login page. Those. It turns out that you will need to log in twice.
This method should not be used on online stores or sites that organize paid subscriptions. But it can be a very effective way to counter attackers.
Apache
On servers with the cPanel panel installed, you can enable this additional authentication method through the panel itself. And for manual configuration you need to create a .htpasswd file and put it in the /wp-admin/ folder
home/user/.htpasswds/public_html/wp-admin/htpasswd/
Then, you will need to create or edit the .htaccess file, adding the lines that you see below and also putting it in /wp-admin/. Make sure you update the directory path and “username” – the username.
AuthName "Admins Only"
AuthUserFile /home/somefolder/.htpasswds/public_html/wp-admin/htpasswd
AuthType basic
require user username
It is important to do everything correctly, otherwise AJAX (admin-ajax) on the external interface of your site will break. If something went wrong, then add the code that you see below to .htaccess.
<Files admin-ajax.php>
Order allow,deny
Allow from all
Satisfy any
</Files>
Nginx
On Nginx servers, you can also add basic HTTP authentication. To do this, just follow the official guide.
Updating WordPress Security Keys
Security keys in WordPress are like a cipher, a set of different, randomly generated characters that are used to encrypt user cookies.
When you install WordPress, keys are generated automatically. However, sometimes it is worth updating them.
The official website has a free tool with which you can create new KBs and replace them in the wp-config.php file.

HTTP security headers
Another step you can take to strengthen WordPress security is to take advantage of HTTP security headers. They are usually configured at the web server level and tell the browser how to behave when interacting with your site’s content. There are many different HTTP security headers, but the following are the most important ones:
Content-Security Policy
X-XSS-Protection
Strict-Transport-Security
X-Frame-Options
Public-Key-Pins
X-Content-Type
You can check which headers are currently running on your WordPress site by running the inspector in your Chrome browser and looking at “Headers” under the “Network” tab in your site’s initial response.
Change wordpress file and folder structure
Wrong_post_idChange the database prefix
Wrong_post_idUse FTPS
To use FTPS over an insecure FTP connection, add this constant to your config.php file.
define('FTP_SSL', true);
Use SFTP
To increase the security of your SSH connection, you can use an SFTP connection if this feature is enabled on your hosting.
Turn off debug mode
By default, debug mode is turned off and should be turned off until you find errors on the site.
define('WP_DEBUG', false);
Add rules to .htaccess
В этом разделе правила для повышения безопасности сайта в файле .htaccess.
Wrong_post_idDeny access to important files
You can block access to important wp-config.php, .htaccess, php.ini files and error logs. Add this rule from the WordPress Codex:
<FilesMatch "^.*(error_log|wp-config\.php|php.ini|\.[hH][tT][aApP].*)$">
Order deny,allow
Deny from all
</FilesMatch>
If you have a php5.ini or php7.ini file instead of php.ini, replace php.ini on the first line with your file.
Deny access to PHP files
Restrict access to PHP files of themes and plugins, as hackers can inject malicious code into them.
Add this code to .htaccess file
# Block access to PHP files
RewriteCond %{REQUEST_URI} !^/wp-content/plugins/file/to/exclude\.php
RewriteCond %{REQUEST_URI} !^/wp-content/plugins/directory/to/exclude/
RewriteRule wp-content/plugins/(.*\.php)$ - [R=404,L]
RewriteCond %{REQUEST_URI} !^/wp-content/themes/file/to/exclude\.php
RewriteCond %{REQUEST_URI} !^/wp-content/themes/directory/to/exclude/
RewriteRule wp-content/themes/(.*\.php)$ - [R=404,L]
Deny access to the wp-includes folder
The wp-includes folder contains important files that can be used to hack the site.
Add this rule to your .htaccess file to protect /wp-includes/:
# Block wp-includes folder and files
<IfModule mod_rewrite.c>
RewriteEngine On
RewriteBase /
RewriteRule ^wp-admin/includes/ - [F,L]
RewriteRule !^wp-includes/ - [S=3]
RewriteRule ^wp-includes/[^/]+\.php$ - [F,L]
RewriteRule ^wp-includes/js/tinymce/langs/.+\.php - [F,L]
RewriteRule ^wp-includes/theme-compat/ - [F,L]
</IfModule>
Deny access to site directories
A hacker can gain access to site folders if he enters the full path to the desired folder in the address bar. For example, an attacker can see the contents of the uploads folder if he enters your-site.ru/wp-content/uploads/ in the address bar.
If you have configured access rights, then it should be impossible to edit these files, but it is still better to deny access to these folders.
To block access to site directories, add this rule to .htaccess:
#Disable site folders browsing
Options All -Indexes
Remove unnecessary files
After installing WordPress, you can delete several files that are no longer needed.
readme.html

wp-config-sample.php

/wp-admin/install.php
The readme.html file contains information about the version of WordPress being used. Hackers can use public information about vulnerabilities in the version of WordPress you are using to break into your site.
Disable user numbering
If an attacker enters your-site.ru/?author=1 into the address bar, he will be redirected to the user’s page with ID = 1. In this case, the hacker will know the username and will only have to find out the password.
Even if users use complex passwords, it is better for the attacker not to know the user IDs. Add this code to .htaccess:
RewriteCond %{QUERY_STRING} author=d
RewriteRule ^ /? [L,R=301]
or

RewriteCond %{REQUEST_URI} !^/wp-admin [NC]
RewriteCond %{QUERY_STRING} ^author=\d+ [NC,OR]
RewriteCond %{QUERY_STRING} ^author=\{num
RewriteRule ^ - [L,R=403]
Or add this code to functions.php:
/* Redirect to Home page */
add_action(‘template_redirect’, ‘tb_template_redirect’);
function tb_template_redirect()
{
if (is_author())
{
wp_redirect( home_url() ); exit;
}
}
Protect your website from malicious scripts
Disable code injection in php files. Add this rule to .htaccess as well:
# Disallow change GLOBALS and _REQUEST
Options +FollowSymLinks
RewriteEngine On
RewriteCond %{QUERY_STRING} (<|%3C).*script.*(>|%3E) [NC,OR]
RewriteCond %{QUERY_STRING} GLOBALS(=|[|%[0-9A-Z]{0,2}) [OR]
RewriteCond %{QUERY_STRING} _REQUEST(=|[|%[0-9A-Z]{0,2})
RewriteRule ^(.*)$ index.php [F,L]
Disable information about the server software version you are using
The Server signature is service information that states that the site uses, for example, a certain version of Apache server and a certain version of Ubuntu OS.
To disable showing software versions on your server, add this .htaccess code:
<IfModule mod_headers.c>
  Header unset X-Powered-By
  Header unset Server
</IfModule>
Remove user with ID 1
When installing WordPress, by default a user with administrator rights is created with ID=1. You already know about changing the username, but you can also change the site administrator ID.
Create a new user with administrator rights, log into the site under the new account and delete the old administrator with ID 1.
Change the error text when logging into the site
By default, WordPress displays a standard message on the login page when a visitor enters an incorrect username or password. This message states what exactly was entered incorrectly—username or password.
When a hacker enters an incorrect password to a valid username, WordPress displays a message that the password is incorrect. This lets him know that the username is correct.
To change the message text, add these lines to functions.php.
/* Return custom message on login */
function no_wordpress_errors(){
  return 'Wrong login or password';
}
add_filter( 'login_errors', 'no_wordpress_errors' );
Replace the message on line 2 with your message.